
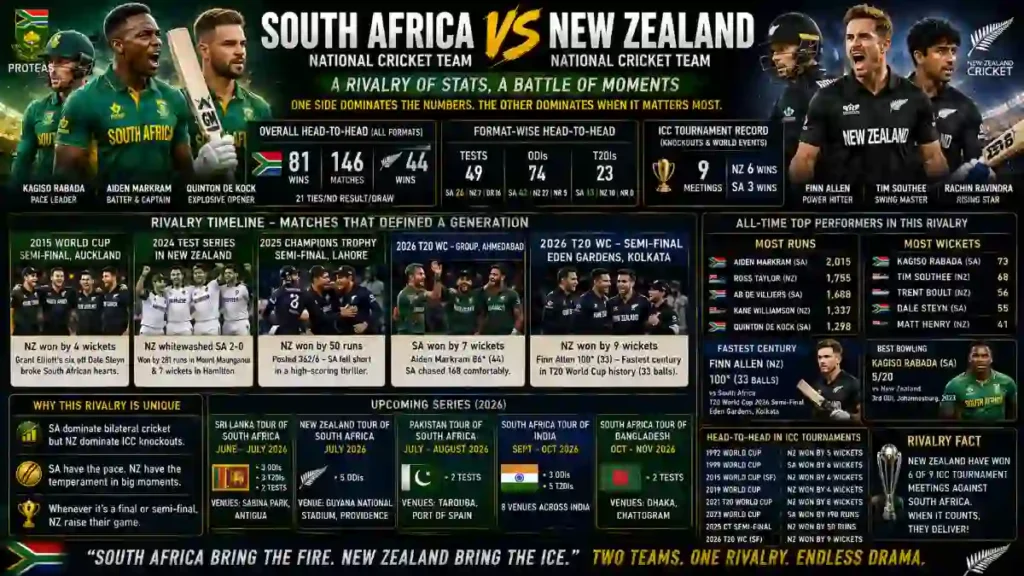

Two balls into the New Zealand innings, the semi-final was still technically a contest. By the end of the second over, it effectively was not.
Tim Seifert and Finn Allen took New Zealand to 55 without loss inside five overs. By the time Allen reached his century off just 33 balls, South Africa’s total of 169 looked less like a target and more like a formality New Zealand had to complete.
This South Africa national cricket team vs New Zealand national cricket team match the 1st Semi-Final of the ICC Men’s T20 World Cup 2026 at Eden Gardens, Kolkata ended with New Zealand winning by nine wickets, with 43 balls to spare. This scorecard covers the full figures.
But the real story is how a team can lose a semi-final despite getting through their own innings twice: once with the bat, and once again inside their own bowling collapse.
Match in 30 Seconds
| Detail | Match information |
|---|---|
| Match | New Zealand vs South Africa, 1st Semi-Final |
| Tournament | ICC Men’s T20 World Cup 2026 |
| Venue | Eden Gardens, Kolkata |
| Toss | New Zealand won the toss and elected to field |
| South Africa score | 169/8 in 20 overs |
| New Zealand score | 173/1 in 12.5 overs |
| Result | New Zealand won by 9 wickets |
| Standout performance | Finn Allen — 100 not out off 33 balls |
The one-line story: South Africa fought back from 12/2 to post a defendable-looking 169, but Finn Allen’s 33-ball century turned New Zealand’s chase into one of the most one-sided semi-final wins in T20 World Cup history.
What people think is that 169 in a World Cup semi-final is a genuinely tough total to chase under pressure.
The reality is blunter: New Zealand reached it with nine wickets and 43 balls unused. This was not a tense finish. It was a statement.
South Africa vs New Zealand Semi-Final Match Scorecard
South Africa innings: 169/8 in 20 overs
| Batter | Runs | Balls | 4s | 6s | Strike rate | Dismissal |
|---|---|---|---|---|---|---|
| Aiden Markram (c) | 18 | 20 | 1 | 1 | 90.00 | c Mitchell b Ravindra |
| Quinton de Kock (wk) | 10 | 8 | 1 | 1 | 125.00 | c Ferguson b McConchie |
| Ryan Rickelton | 0 | 1 | 0 | 0 | 0.00 | c Allen b McConchie |
| Dewald Brevis | 34 | 27 | 3 | 2 | 125.93 | c Santner b Neesham |
| David Miller | 6 | 6 | 0 | 0 | 100.00 | c Mitchell b Ravindra |
| Tristan Stubbs | 29 | 24 | 2 | 1 | 120.83 | b Ferguson |
| Marco Jansen* | 55 | 30 | 2 | 5 | 183.33 | not out |
| Corbin Bosch | 2 | 3 | 0 | 0 | 66.67 | b Henry |
| Kagiso Rabada | 0 | 1 | 0 | 0 | 0.00 | c Neesham b Henry |
| Keshav Maharaj* | 1 | 1 | 0 | 0 | 100.00 | not out |
| Extras | 14 | — | — | — | — | 1 lb, 1 nb, 12 w |
| Total | 169/8 | 20 overs |
Fall of wickets: 12/1 (1.4), 12/2 (1.5), 55/3 (7.4), 77/4 (9.6), 77/5 (10.2), 150/6 (18.1), 166/7 (19.3), 166/8 (19.4). Lungi Ngidi did not bat.
New Zealand bowling figures
| Bowler | Overs | Runs | Wickets | Economy |
|---|---|---|---|---|
| Matt Henry | 4 | 34 | 2 | 8.50 |
| Cole McConchie | 1 | 9 | 2 | 9.00 |
| Lockie Ferguson | 4 | 29 | 1 | 7.25 |
| Jimmy Neesham | 3 | 42 | 1 | 14.00 |
| Mitchell Santner | 4 | 25 | 0 | 6.25 |
| Rachin Ravindra | 4 | 29 | 2 | 7.25 |
New Zealand innings: 173/1 in 12.5 overs
| Batter | Runs | Balls | 4s | 6s | Strike rate | Dismissal |
|---|---|---|---|---|---|---|
| Tim Seifert (wk) | 58 | 33 | 7 | 2 | 175.76 | b Rabada |
| Finn Allen* | 100 | 33 | 10 | 8 | 303.03 | not out |
| Rachin Ravindra* | 13 | 11 | 2 | 0 | 118.18 | not out |
| Extras | 2 | — | — | — | — | 2 lb |
| Total | 173/1 | 12.5 overs |
Fall of wickets: 117/1 (Tim Seifert, 9.1). Glenn Phillips, Mark Chapman, Daryl Mitchell, Mitchell Santner, Jimmy Neesham, Cole McConchie, Matt Henry and Lockie Ferguson did not bat.
South Africa bowling figures
| Bowler | Overs | Runs | Wickets | Economy |
|---|---|---|---|---|
| Marco Jansen | 2.5 | 53 | 0 | 18.70 |
| Kagiso Rabada | 3 | 28 | 1 | 9.33 |
| Lungi Ngidi | 2 | 22 | 0 | 11.00 |
| Corbin Bosch | 2 | 35 | 0 | 17.50 |
| Keshav Maharaj | 3 | 33 | 0 | 11.00 |
Read Also:- England Cricket Team Vs India National Cricket Team Players
Highlights and Key Moments
1. South Africa’s 12/2 powerplay collapse set the tone
Quinton de Kock fell for 10 in the second over. Ryan Rickelton followed for a first-ball duck. South Africa were 12 for 2 inside two overs, and the semi-final’s first crisis had already arrived.
What most people miss: a semi-final powerplay collapse does more damage than the same collapse in a league match. There is no next game to recover momentum from. South Africa’s middle order had to build an entire innings under knockout pressure after their openers gave them almost nothing.
2. Brevis and Jansen built the total then South Africa collapsed again
Dewald Brevis made 34 off 27, and Tristan Stubbs added 29 off 24, steadying the innings after the early damage. But the real rescue came from Marco Jansen, whose 55 not out off 30 balls, including five sixes, dragged South Africa from a modest platform to a total that at least looked competitive on paper.
Then, in the closing overs, South Africa lost their last four wickets for just 19 runs, going from 150/6 to 169/8 in the space of ten balls.
This is where things go wrong: two separate collapses in one innings is rare, and it signals a structural batting problem, not bad luck. South Africa’s innings was effectively rescued once by Jansen and then undermined again immediately after his effort by the tail’s inability to rotate strike.
3. Seifert and Allen erased 169 before the match had a chance to breathe
New Zealand’s chase began with intent and never slowed down. Tim Seifert and Finn Allen added 117 runs for the first wicket before Seifert fell in the 9.1st over.
By that point, the match state read almost like a formality: New Zealand needed just 53 more from more than 10 overs, with nine wickets in hand.
Counterintuitive idea: most people assume a 9-wicket win means the bowling side never created pressure. In reality, South Africa’s bowlers were simply not given a workable margin. Jansen’s 55* meant 169 was the ceiling of a rescued innings, not the platform of a genuinely dominant one and Allen treated that ceiling as an invitation.
4. How rare was this chase, really?
New Zealand completed a 170-run semi-final chase in 12.5 overs, at a required rate that was never remotely under pressure. A nine-wicket win with 43 balls unused, in a World Cup knockout match, is one of the most emphatic results possible short of an all-out bowling demolition.
Original observation: in T20 World Cup history, most semi-finals are decided in the final five overs. This one was decided by the end of the sixth. That single fact should be the headline of any serious match report not a footnote after the batting cards.
Player Performance Breakdown
Finn Allen 100 off 33: the fastest route to a semi-final century
Allen’s innings included 10 fours and 8 sixes at a strike rate of 303.03. That is not simply a good T20 innings; it is one of the most destructive individual performances possible on the sport’s biggest stage.
| Phase | Approach | Effect |
|---|---|---|
| Overs 1–3 | Attacked spin and pace equally from ball one | Set an immediate scoring tempo above 10 an over |
| Overs 4–7 | Targeted the shorter boundary against part-time options | Accelerated past 50 while Seifert kept the other end ticking |
| Overs 8–9 | Continued unbroken aggression | Reached his century and effectively ended the contest |
Bold opinion: Allen’s innings should be remembered as more significant than most World Cup final centuries, precisely because it was delivered in a knockout semi-final where a single failure ends the tournament. Pressure did not slow him down it sped him up.
Marco Jansen 55 not out off 30: the innings that made 169 possible
Without Jansen, South Africa’s total does not reach a number anyone could call defendable. He arrived with the innings already dented by an early collapse and turned a total heading toward 130–140 into 169.
Practical lesson: Jansen’s innings shows the value of a lower-order batter who can strike at 183 while the top order has already failed twice. Teams that rely on one recovery innings per collapse are fragile South Africa needed Jansen to be perfect, and he was, but perfection from one batter cannot fix two separate top-order failures.
Tim Seifert 58 off 33: the ignored half-century
Seifert’s 58 off 33 balls, including seven fours and two sixes, would be the headline of almost any other match. Here, it is overshadowed entirely by Allen’s century.
What people think vs reality: casual readers will remember this match only for Allen’s innings. The reality is that Seifert’s strike rate of 175.76 at the other end meant South Africa never had a single over of relief. Two batters attacking simultaneously is far harder to bowl to than one Seifert’s contribution enabled Allen’s freedom just as much as Allen’s hitting overshadowed Seifert’s effort.
Rachin Ravindra and Cole McConchie New Zealand’s bowling value
While the batting dominated headlines, New Zealand’s bowling also did its job. Ravindra took 2/29, dismissing Markram and Miller, while McConchie’s brief but sharp 1-over burst returned 2/9, removing de Kock and Rickelton inside the powerplay.
Common mistake: overlooking the bowling contribution in a match remembered for one batting performance. New Zealand’s bowlers ensured South Africa never crossed 170, which meant Allen and Seifert had a genuinely achievable target rather than a testing one.
Analysis: Why South Africa Lost the Semi-Final
169 needed to be 190
What people think: 169 is a reasonable, defendable total in a low-scoring knockout match.
Reality: on a surface where New Zealand’s openers struck at a combined rate well above 200, South Africa needed a total in the 190s to have a genuine chance. Jansen’s heroics got them to a number that looked adequate on paper but was nowhere near enough against the conditions New Zealand’s batters exploited.
South Africa’s bowling had no answer for pace-off-the-bat hitting
Jansen, South Africa’s most destructive batter with the bat, was also their most expensive bowler, conceding 53 runs in just 2.5 overs. Bosch and Maharaj were similarly unable to find control, going at 17.50 and 11.00 respectively.
The common thread is clear: New Zealand’s top order attacked length deliveries with clean bat swings rather than needing to manufacture risk. South Africa’s bowling plans, effective in other matches this tournament, had no answer once the openers decided to play without hesitation from ball one.
The tournament-stakes verdict
A nine-wicket semi-final loss is not just a scoreline. It ends a campaign in the most emphatic way possible, without the drama of a last-over finish to soften the outcome.
Bold opinion: South Africa’s collapse pattern two separate batting failures in one innings, bookending a brilliant individual rescue is the same structural issue that has cost knockout T20 teams in previous tournaments. A team that needs one player to bat like Jansen just to reach a defendable total has a depth problem the scoreline of a single semi-final cannot hide.
Read Also:- Zimbabwe National Cricket Team Vs India National Cricket Team Players
Records, Context and What This Means for the Final
New Zealand’s nine-wicket win, completed in 12.5 overs, sends them into the final off the back of one of the most dominant knockout-stage batting performances of the tournament. Finn Allen’s century and Tim Seifert’s half-century gave New Zealand an opening stand of 117, effectively deciding the match before the halfway point of the chase.
For South Africa, the tournament ends at the semi-final stage. Marco Jansen’s 55 not out will be remembered as an outstanding individual effort in a losing cause, alongside contributions from Brevis and Stubbs that were ultimately undone by two separate top-order collapses.
Entity and context guardrail
| Source type | What it actually covers | How to use it correctly |
|---|---|---|
| This match report | ICC Men’s T20 World Cup 2026, 1st Semi-Final, Eden Gardens | Primary scorecard and analysis |
| Wikipedia bilateral tour page | “South African cricket team in New Zealand 2025–26” — a separate bilateral series | Background/historical link only, clearly labelled as a different tour |
| Cricinfo head-to-head records | All-format combined Test, ODI and T20I history between the two nations | Reference table for long-term rivalry context, never blended into this scorecard |